BonsaiLessons.com is reader-supported. When you purchase through links on our site, we may earn an affiliate commission at no extra cost to you.
Quick Answer: What Is Bonsai Air Layering?
Bonsai air layering is a propagation technique where you wound a section of bark on a living branch, wrap the spot in damp sphagnum moss, and wait for new roots to form before separating the rooted section. The result is a clone of the parent tree with a developed trunk, ready for training.
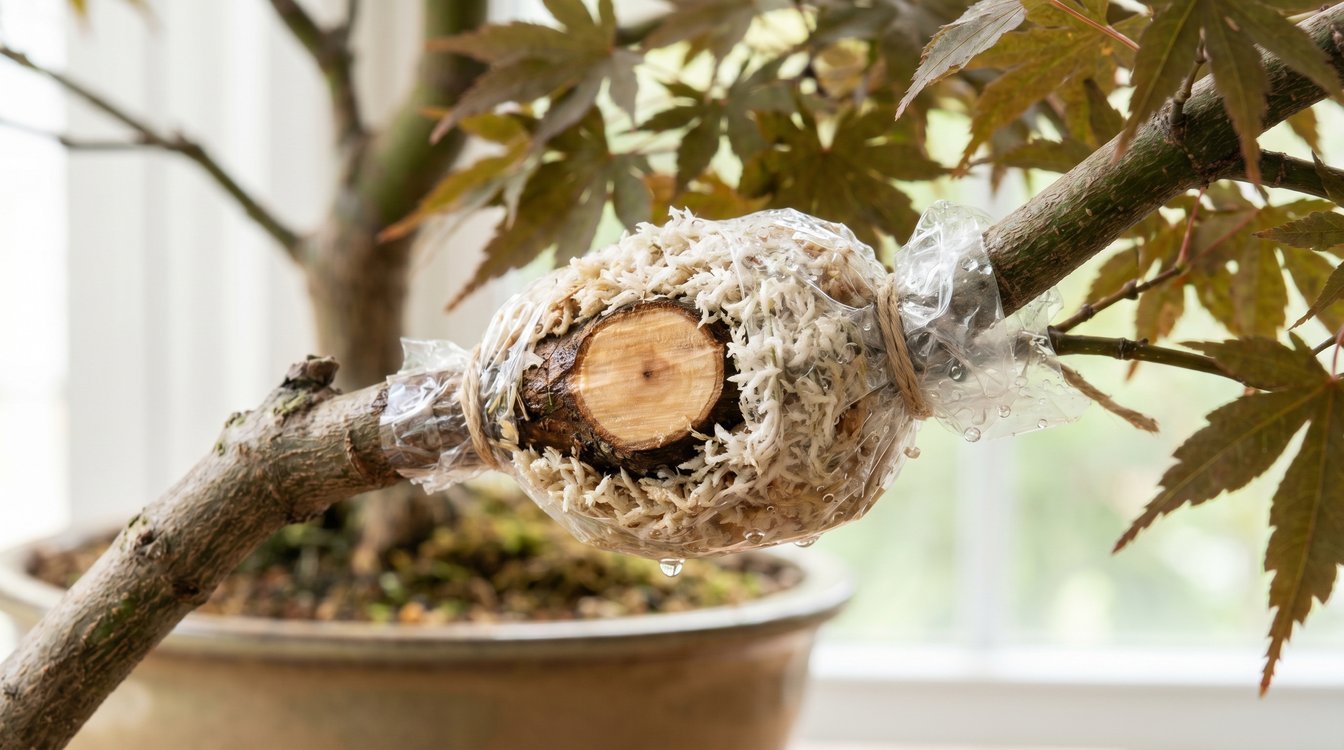
Air layering produces a finished-looking bonsai in a fraction of the time it takes to grow one from seed. You start with a thick, mature branch, force it to grow its own root system while still attached to the parent, then cut it free as an independent tree with established taper and character.
The technique sounds intimidating to most beginners, but the actual process takes about twenty minutes per branch and uses tools you probably already own. The wait between wrapping the moss and seeing white roots through the plastic is the hardest part, and even that runs only six to sixteen weeks for most common bonsai species.
In this guide we walk through the biology behind why air layering works, the best season to attempt it, which species respond well, the exact materials you need, every step of the procedure, and troubleshooting for the most common problems beginners run into.
What Is Bonsai Air Layering?
Air layering, sometimes called marcotting, is a vegetative propagation method that creates roots on a branch while it remains attached to the parent tree. You strip a ring of bark from the branch, expose the cambium layer underneath, wrap the wound in moist sphagnum moss, and seal the bundle in plastic. Within weeks, roots emerge from the upper edge of the cut and grow into the moss ball.
This differs from taking cuttings in one critical way. A cutting is severed from the parent immediately and must survive on stored energy while it tries to root, which is why so many cuttings fail. An air layered branch keeps drawing water and sugars from the parent tree the entire time it roots, so it never experiences drought stress. That single difference is why air layering succeeds on species that almost never strike from cuttings, including pines, oaks, and many junipers.
The biology is elegant once you understand it. Sap moves up through the xylem (the inner woody tissue) and sugars produced by photosynthesis travel down through the phloem, which sits just under the bark. When you girdle a branch and remove the cambium ring, you sever the downward phloem flow. Carbohydrates and the plant hormone auxin pile up at the cut, while water and nutrients keep arriving from below through the xylem. That nutrient-rich, hormone-soaked wound is the perfect environment for adventitious roots to form. The Royal Horticultural Society guidelines on layering explain the same principle for ornamental trees and shrubs, and the technique is essentially identical for bonsai.
Why Bonsai Growers Use Air Layering
Three reasons drive most bonsai growers toward air layering. You skip years of trunk development, you get to choose the exact section of trunk you want, and you can build a perfect nebari (the radial flare of surface roots) right from the start by selecting where the new roots will emerge.
Growing a bonsai from seed teaches patience, but it also tests it. You can read more about realistic timelines in our breakdown of how long bonsai takes to grow, and once you see the numbers you understand why propagation shortcuts matter. A trunk thick enough to look like a mature tree might take fifteen to thirty years from seed. Air layering takes a season.
Air Layering vs Cuttings vs Seeds
| Method | Difficulty | Time to Rooted Tree | Success Rate | Best For |
|---|---|---|---|---|
| Air Layering | Moderate | 6 to 16 weeks | 70 to 95 percent (species dependent) | Mature material, instant trunk thickness, difficult species |
| Cuttings | Easy to moderate | 4 to 12 weeks | 30 to 80 percent | Easy-rooting species like ficus, willow, elm |
| Seeds | Easy to start, hard to finish | 10 to 30 years to a mature trunk | High germination, slow growth | Genetic variety, full lifecycle experience |
Beyond the time advantage, air layering produces a genetic clone of the parent. If you have a Japanese maple with stunning red autumn color or a ficus with unusual aerial root habit, you can replicate those exact traits in the new tree. Seeds will not do that because the offspring inherit a random combination of parent genes. The nebari benefit also deserves emphasis. Roots that emerge from an air layer cut radiate outward in a flat, even plane because the moss restricts vertical growth, giving you the radial surface root flare that takes decades to develop on a nursery tree.
Best Time to Air Layer Bonsai
Late spring is the sweet spot for the vast majority of species. By late spring, the first flush of leaves has hardened off (the soft new growth has matured into firm, fully-expanded leaves), the sap is moving aggressively, and the cambium is actively dividing. Air layers started during this window root the fastest and most reliably.
Avoid starting an air layer during a heat wave. High temperatures stress the parent tree and dry out the moss faster than you can keep up with. Also avoid late fall, because the tree will be entering dormancy and root initiation slows to nothing. Some tropical species like ficus can be air layered nearly year-round if kept in warm conditions, which is why they make excellent practice subjects.
A typical seasonal timeline looks like this. Wrap the layer in May or early June. Check moisture at four weeks. Look for visible roots through the plastic at six to eight weeks. Separate and pot up the new tree between July and September, depending on species. Deciduous trees like maples often root in six to ten weeks. Conifers like pines and junipers may need a full season or even two, with separation pushed to the following spring.
Which Bonsai Species Respond Best to Air Layering
Some species root so willingly you almost cannot fail. Others test the patience of even experienced growers. Knowing what to expect from your subject saves a lot of frustration.
| Species | Success Rate | Best Season | Notes |
|---|---|---|---|
| Japanese Maple (Acer palmatum) | 85 to 95 percent | Late spring after leaves harden | Roots in 6 to 10 weeks, ideal beginner species |
| Trident Maple (Acer buergerianum) | 90 to 95 percent | Late spring | Even easier than mountain maple, vigorous rooting |
| Chinese Elm (Ulmus parvifolia) | 85 to 95 percent | Spring or early summer | Reliable rooter, good for shohin-sized layers |
| Ficus (multiple varieties) | 95 percent plus | Year-round indoors, late spring outdoors | The easiest species in this list, beginners should start here |
| Azalea (Rhododendron indicum) | 70 to 85 percent | After flowering finishes | Use long sphagnum, keep moss acidic, avoid drying out |
| Juniper (Juniperus chinensis and others) | 50 to 75 percent | Early to mid spring | Slow rooter, often needs full growing season, do not over-water moss |
| Pine (Pinus species) | 40 to 70 percent | Spring before candle extension | Slow, sometimes needs two seasons, use thick moss layer |
| Oak (Quercus species) | 50 to 70 percent | Late spring | Can be stubborn, results vary by species, use generous hormone |
If this is your first attempt at the technique, start with a ficus or a Chinese elm. The high success rate builds confidence, and the rooting timeline is short enough that you see results within the same season. We suggest saving pines and oaks for after you have a few successful layers under your belt.
What You’ll Need: Materials List
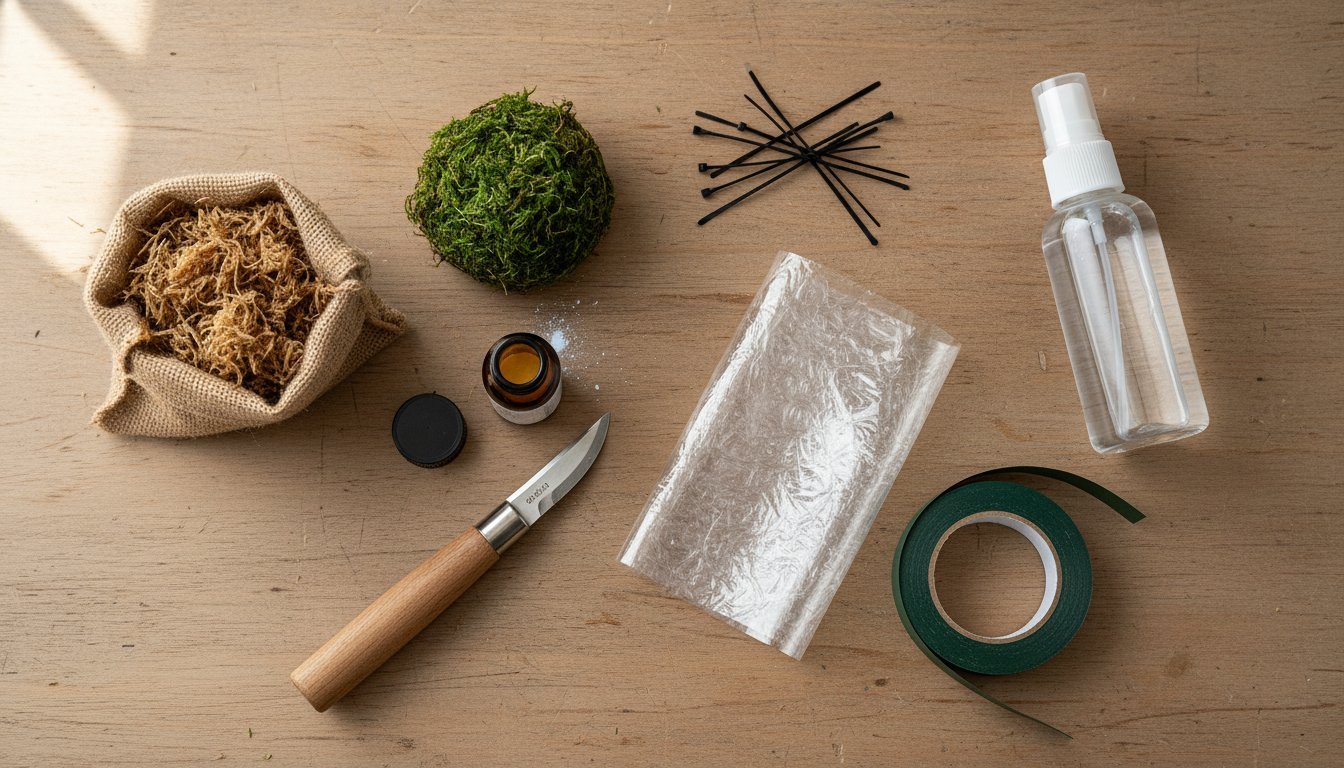
Almost everything on this list lives in a hardware store or a garden center, and the consumables (moss, hormone, tape) cost roughly fifteen to thirty dollars total. Amazon carries the entire kit. You can buy the items individually or grab a pre-assembled air layering kit, which is a smart move for beginners because the proportions are already correct.
| Material | Purpose | Notes |
|---|---|---|
| Long fiber sphagnum moss | Holds moisture around the wound, supports new roots | Buy compressed bricks, soak before use, available cheaply on Amazon |
| Grafting tape or clear plastic wrap | Wraps the moss ball, retains humidity | Clear plastic lets you see root development, parafilm grafting tape is excellent |
| Sharp grafting knife or utility knife | Makes clean girdle cuts through the bark | A fresh blade is critical, dull blades crush cambium |
| Rooting hormone powder (IBA) | Stimulates adventitious root formation | Indole-3-butyric acid 0.1 to 0.3 percent works for most species |
| Aluminum foil (optional outer layer) | Blocks light, regulates temperature | Useful in hot climates, wrap over the plastic |
| Twist ties, raffia, or zip ties | Secures the wrap at both ends | Tight seal is essential, loose ends let the moss dry out |
| Wound sealant or cut paste | Protects the top edge of the cut from drying | Optional but helpful on thin-barked species |
| Small spray bottle | Re-wetting the moss if it dries | Distilled or rainwater is best, tap water is fine for most species |
One tool worth investing in is a good grafting knife. A surgical-quality blade makes cleaner cuts than a utility knife, which means less crushed tissue and faster healing. The investment pays for itself the first time you successfully layer a Japanese maple.
Step-by-Step: How to Air Layer a Bonsai
Read every step before you start cutting. The procedure goes quickly once you understand it, but mistakes at the girdle stage cannot be undone.
- Choose the branch. Pick a healthy branch between pencil-thick and roughly two inches in diameter. Thinner branches root faster but produce small trees. Thicker branches give you instant trunk presence but root more slowly. The branch should have good taper, interesting movement, and at least a few side branches above the planned cut site to support future styling.
- Find the spot to layer. Look for a position just below a node, ideally where you can imagine a beautiful nebari forming. Avoid bulges, old wounds, and graft unions. The roots will emerge from the upper edge of the cut, so visualize the eventual root spread when choosing the location.
- Make the girdle cut. Using your sharp knife, score two parallel rings around the branch, two to three centimeters apart. The width of the ring should equal roughly one and a half times the branch diameter. Connect the two rings with a vertical cut, then peel the bark ring off completely. Scrape the exposed wood with the back of the knife to remove any remaining cambium (the thin, slippery green layer just under the bark). If even a sliver of cambium remains, the bark will bridge the wound and your layer will fail.
- Dry the wound briefly. Let the cut air-dry for thirty to sixty minutes. This callouses the surface slightly and reduces the chance of bark regrowing across the wound. Do not skip this on thin-barked species like maple.
- Apply rooting hormone. Lightly dust the upper edge of the cut (the side facing the canopy) with IBA rooting powder. A thin coating is all you need. Excess hormone can actually inhibit rooting.
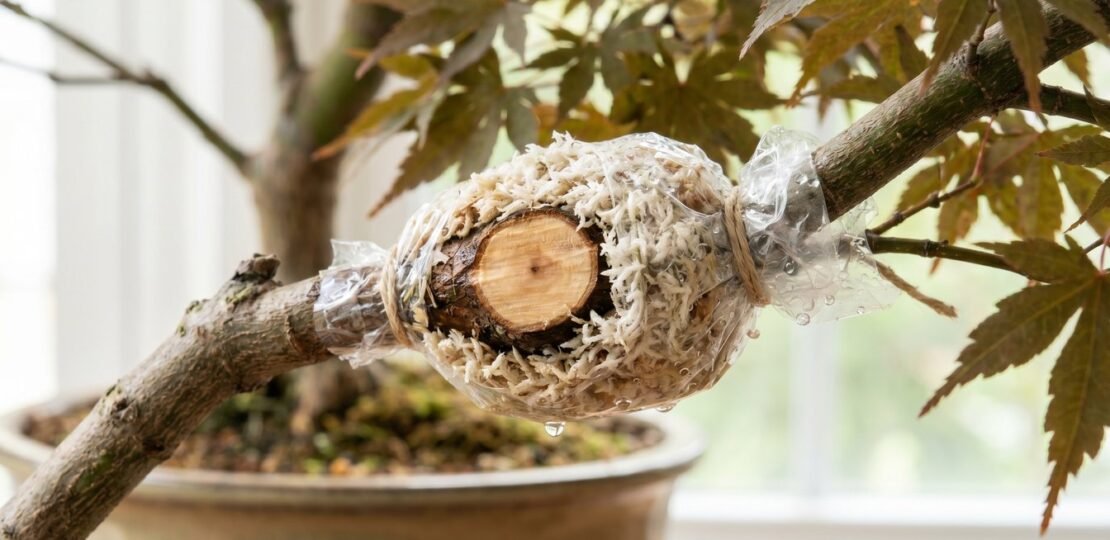
- Pack wet sphagnum moss around the wound. Soak your moss in water for at least an hour, then squeeze it until water no longer drips freely but the moss is still saturated. Form a fist-sized ball around the cut, making sure the moss completely covers the wound and extends two to three centimeters above and below the girdle.
- Wrap with plastic. Cover the moss ball with clear plastic wrap or a clear plastic bag. Seal both ends tightly against the branch using grafting tape, twist ties, or zip ties. The seal needs to be airtight enough to hold moisture for weeks but not so tight that it strangles the branch. In hot climates, add an outer layer of aluminum foil to reflect heat.
- Check after four to six weeks. Look through the clear plastic for white root tips emerging from the upper edge of the cut. Do not unwrap the layer to peek, just look through the plastic. If the moss has dried out, inject water through a small hole with a syringe and reseal the hole with tape.
- Wait for full root development. Strong white roots filling the entire moss ball indicate the layer is ready. Weak, sparse roots mean you should wait another two to four weeks. Patience here pays off, because under-rooted layers often fail after separation.
- Sever below the air layer. Once roots are well developed, use sharp pruning shears or a saw to cut the branch off just below the moss ball. Work carefully to avoid jostling the new roots. Carry the layer to your potting area immediately.
- Pot up the new tree. Unwrap the plastic gently and leave the moss attached to the roots, because pulling it off will tear young roots. Plant the layer in a training pot using a free-draining mix. Our complete guide to bonsai soil mix walks through the best particle sizes and components for newly rooted material. Choose your container thoughtfully. A deep training pot works better than a shallow show pot for the first season, and our advice on choosing a bonsai pot can help if you are not sure what to use. For the actual transplanting procedure, follow our walkthrough on how to repot a bonsai.
- Aftercare. Place the new tree in shade for two to four weeks. Mist the foliage daily, protect the pot from wind, and do not fertilize for at least six weeks. The young root system cannot yet support full transpiration, so reducing stress is the goal. After a month in shade, gradually reintroduce the tree to its normal light conditions over another two weeks.
After you separate the layer, do not forget the parent tree. Where you cut the branch off, the parent will need a clean pruning cut and possibly some shaping. Our guide on how to prune a bonsai tree covers cut placement and sealing the wound to help the parent recover quickly.
Common Air Layering Problems and Fixes
Even seasoned bonsai practitioners run into issues with air layers. Most problems trace back to one of five causes, and each has a straightforward fix.
Moss drying out. The most common problem in the first month is moisture loss. The plastic wrap should hold humidity for several weeks, but heat and wind accelerate evaporation. Check the layer every two weeks by gently squeezing the moss ball. If it feels light and dry, inject water with a syringe through a small puncture in the plastic, then tape the hole closed. Dry moss kills new roots faster than almost any other mistake.
Mold on the moss. Some surface mold is normal and not necessarily a problem. It looks alarming through the plastic, but as long as the developing roots stay white and firm, the layer is fine. If mold becomes excessive (covering more than half the visible moss), open one end of the wrap for an hour to ventilate, then reseal. You can also add a small amount of cinnamon powder when packing the moss, which acts as a mild natural fungicide.
No roots after twelve or more weeks. If you cannot see any root development by week twelve, several factors might be at play. The species may simply be slow (pines and oaks often need a full year). The timing might have been wrong (layers started too late in the season may not root until the following spring). Most commonly, the cambium was not completely removed, and the bark has bridged the wound. Carefully unwrap and inspect. If the bark has regrown across the cut, you can either re-girdle the area and rewrap, or accept that the attempt failed and try again next season.
Roots forming but weak. A few thin, white roots are not enough to sustain the new tree after separation. Wait. The most common reason for layer failure after separation is impatience. A properly rooted layer should have a dense network of roots filling the entire moss ball, visible through the plastic from multiple angles. If your layer has only a few wispy roots after eight weeks, leave it on the parent for another month and check again.
Layer dying back. If the foliage on the air layer is wilting, yellowing, or dropping, something has gone wrong. The most likely culprits are incomplete cambium removal (which allows the bark to bridge but disrupts vascular function), an overly tight wrap that has girdled the branch beyond the intended cut, or bacterial or fungal infection. Inspect the layer carefully. If the wood under the moss has gone soft or smells off, the layer cannot be saved and should be removed to protect the parent tree.
FAQ Section
How long does bonsai air layering take?
For most popular bonsai species, expect six to sixteen weeks from wrapping to visible roots ready for separation. Ficus and Chinese elm often root in as little as six weeks. Japanese maples typically need eight to twelve weeks. Conifers like pines and junipers may need a full growing season or even two before they produce enough roots to support an independent tree. Tropical species can be layered year-round in warm conditions.
Can you air layer in summer?
You can, but late spring is better for most species. Layers started in mid to late spring have the entire growing season ahead of them and benefit from the strongest sap flow of the year. Mid-summer layering works in mild climates, but during heat waves the moss dries out faster than you can rewet it, and the parent tree is under enough stress without adding a wound. Avoid starting layers within six weeks of expected first frost.
Does air layering work on all bonsai species?
Almost, but not equally. Tropical species like ficus and reliable temperate trees like maples and elms succeed with high consistency. Pines, oaks, and certain junipers are harder. A few species require a full year of attachment or sometimes two attempts. Success rates vary from roughly forty percent to over ninety-five percent depending on the tree.
Do you need rooting hormone for bonsai air layering?
Hormone is not strictly required, but we suggest using it. IBA (indole-3-butyric acid) rooting powder speeds up root initiation by mimicking the natural plant hormone auxin, which accumulates at the wound site. Easy-rooting species like ficus and willow will root without it. Slower species like pines and oaks benefit significantly. A small container of rooting hormone costs less than ten dollars and lasts for years.
What to do with the parent tree after separation?
Clean up the cut where you removed the layer. A flush, slightly concave cut heals best. Apply cut paste or wound sealant if you have it. The parent will sprout new growth below the cut within a few weeks, and that growth can become a new leader or be pruned away for styling. The parent tree continues to function normally and is often used as a stock plant for additional layers in following seasons.
Can you air layer indoor bonsai like ficus?
Yes, and ficus is one of the best indoor candidates. Ficus species root so readily that even sloppy technique tends to succeed. Indoor air layering offers controlled temperature, no weather fluctuations, and the option to layer year-round. Keep the parent tree in bright indirect light, maintain steady warmth around seventy to eighty degrees Fahrenheit, and check moss moisture weekly. Indoor layers often root faster than outdoor ones because conditions stay consistent.
What is the difference between air layering and grafting?
Air layering creates a new tree from a single parent by inducing roots on a branch. Grafting joins two different plants (a rootstock and a scion) so they grow as one. Air layering produces a genetic clone with its own roots. Grafting can combine the desirable foliage of one tree with the strong roots of another. Both techniques have a place in bonsai, but they solve different problems. Air layering is generally easier for beginners.
If you want to go deeper into the technique or connect with experienced practitioners, the American Bonsai Society hosts conventions, study groups, and educational resources where you can watch experts demonstrate air layering on a range of species. Local bonsai clubs affiliated with the society often run hands-on workshops during the spring layering season, which is the fastest way to learn the technique well.
Air layering rewards practice. Your first attempt may surprise you with how well it works, or it may teach you something through failure. Either way, you will be standing in front of a tree you helped create within a single growing season, which is a feeling that growing from seed simply cannot match. Start with a forgiving species, follow the steps carefully, and you will have your first air layered bonsai by the end of summer.