How to Repot a Bonsai Tree: Step-by-Step Guide for Beginners (2026)
May 12, 2026 | by Ian
How to Repot a Bonsai Tree: Step-by-Step Guide for Beginners (2026)
Your bonsai’s pot is its whole world. Every drop of water, every nutrient, every breath of air around the roots gets filtered through a few cups of soil. So when that soil breaks down or the roots fill the container, your tree starts to suffocate quietly, long before the leaves tell you something is wrong. Repotting is the single most important maintenance task you’ll do as a bonsai owner, and it’s also the one that scares beginners the most.
The good news: repotting is a skill, not a mystery. Once you understand the timing, the signs, and the actual mechanics, you’ll find it deeply satisfying. This guide walks you from “does my tree even need this?” all the way through aftercare, with species-specific timing, tool picks, soil ratios, and the mistakes I see new growers make every spring.
Quick answer: To repot a bonsai, gently lift the tree from its pot in early spring just as buds begin to swell, comb out the root ball with a root hook, and prune away roughly one-third of the roots with sharp shears. Prepare the pot with mesh over drainage holes, anchor wires, and a base layer of fresh free-draining bonsai soil. Settle the tree back in, work soil between the roots with a chopstick, water thoroughly until runoff is clear, and place the tree in shaded shelter for two to four weeks while it recovers.
Before we dig in, a quick foundation. If this is one of your first trees, you’ll want to pair this guide with our complete bonsai care guide so you understand watering, light, and seasonal rhythm in context. Repotting works best when the rest of your care routine is solid.
Signs Your Bonsai Needs Repotting
Not every tree needs annual repotting. In fact, repotting too often is just as harmful as waiting too long. Your tree will tell you when it’s time if you know what to look for. Check for these five diagnostic signs every late winter, before bud break.
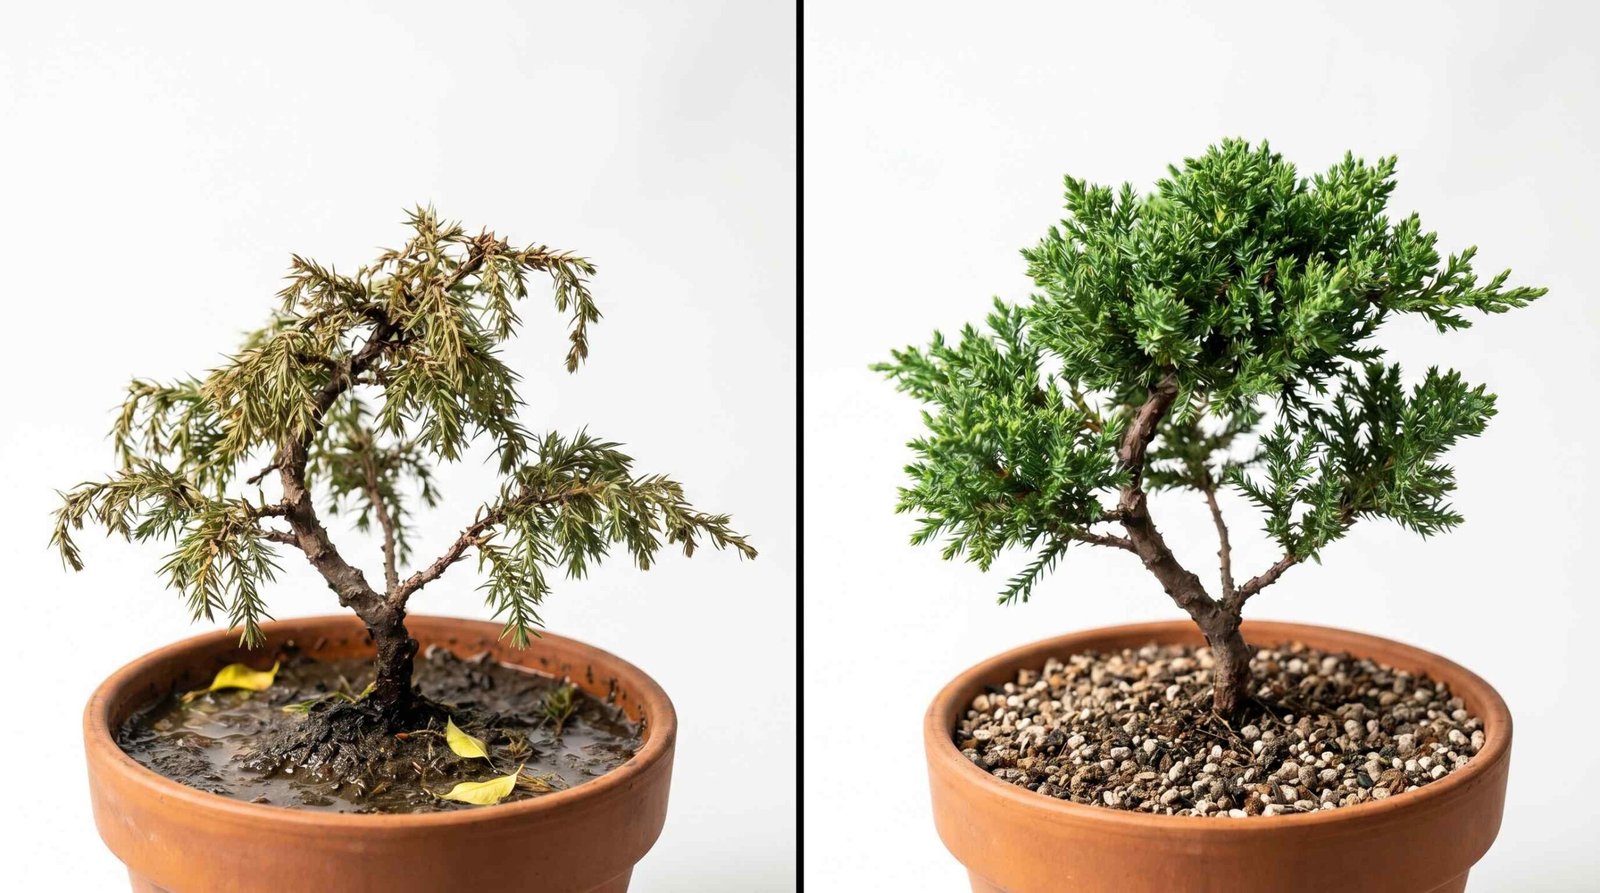
- Water sits on the surface. Healthy bonsai soil drains within seconds. If water pools on top for more than 10 to 15 seconds, the soil particles have broken down into a sludge that’s choking the roots. This is the most reliable single indicator.
- Roots circling the drainage holes. Tip the pot and look at the bottom. If you see thick, woody roots curling out of the drainage holes or pressed flat against the mesh, the root system has run out of room.
- The tree lifts as a unit. Gently grasp the trunk and rock it. If the entire root mass shifts as one solid block with the pot, you have a “pot-bound” tree. A healthy root system has give and feels softer.
- Slowed growth or pale leaves. A tree that flushed strongly last year but produced short, weak shoots this spring is often signaling root congestion. Pale, smaller-than-usual leaves point the same direction, especially in a tree that gets adequate light and bonsai fertilizer.
- The tree is rising out of the pot. If the surface of the soil has crept upward over the rim, the root ball is swelling. This is common with vigorous species like Chinese elm and trident maple.
Two or more of these signs together means it’s time. One sign on its own is worth watching for another season.
When to Repot: Species Timing Table
Timing is everything. Repot a tropical in February in Vermont and you’ll likely kill it. Repot a juniper in August and you’ll do the same. The general rule is “just before the spring growth push,” but the calendar shifts by species and climate. Use this table as a starting point and adjust to your local weather.
| Species | Repotting Frequency | Best Season | Notes |
|---|---|---|---|
| Juniper (Procumbens, Shimpaku) | Every 2 to 3 years | Early spring, as buds swell | Prune roots conservatively. See our juniper bonsai care guide for climate-specific timing. |
| Japanese Maple | Every 2 years (young), 3 to 5 years (mature) | Late winter to early spring | Bleeds sap if cut too late. Repot before leaves emerge. |
| Chinese Elm | Every 1 to 2 years | Early spring or fall (mild climates) | Vigorous grower. Tolerates aggressive root pruning. |
| Ficus (Retusa, Ginseng) | Every 2 years | Mid-spring through summer | Tropical. Needs warmth above 18C / 65F to recover. |
| Japanese Black Pine | Every 3 to 5 years | Late winter to early spring | Preserve mycorrhizae. Never bare-root a healthy pine. |
| Trident Maple | Every 1 to 2 years | Late winter, before bud swell | Aggressive grower. Roots can crack thin pots if neglected. |
| Azalea (Satsuki) | Every 2 years | Just after flowering (late spring) | Acidic soil mix required. Kanuma is the standard substrate. |
| Jade (Portulacaria) | Every 2 to 3 years | Late spring to summer | Let soil dry completely before repotting. Succulent care rules apply. |
| Boxwood | Every 2 to 3 years | Early to mid-spring | Avoid heavy root pruning. Slow recovery. |
| Olive | Every 2 to 3 years | Late spring | Wait until nighttime lows are reliably above 10C / 50F. |
Young trees in development pots (under five years old) often benefit from yearly repotting because they’re putting on root mass quickly. Mature, refined trees with slow growth can go three to five years between repottings without issue.
Tools You’ll Need
You can repot a tree with kitchen scissors and a fork. You’ll have a much better time, and a healthier tree, with proper equipment. Here’s the short list every beginner should own. If you’re building your kit from scratch, our roundup of essential bonsai supplies covers everything in one place.
- Concave cutters. Heavy-duty cutters with a curved blade for removing thick roots cleanly. Cuts heal flat without leaving stumps. A single good pair lasts decades.
- Root shears. Long-handled, narrow-bladed shears designed to reach inside a root ball. Sharper and tougher than household scissors.
- Root hook. A single curved metal hook on a wooden handle. The tool that does 80 percent of the work, used to comb roots outward from the trunk without tearing them.
- Bonsai chopsticks. Yes, chopsticks. Used to work fresh soil into the gaps between roots so no air pockets remain. Bamboo skewers work in a pinch.
- Drainage mesh and anchor wire. Plastic mesh squares to cover drainage holes, plus 2mm aluminum wire to anchor the tree into the pot.
- Bonsai soil mix. Pre-mixed substrate or individual components (akadama, pumice, lava rock). Never use general potting soil. More on this below.
- A turntable. Optional but transformative. Lets you rotate the tree without picking it up, keeping cuts even.
Don’t forget the pot itself. If you’re upgrading to a final display pot, take a moment with our guide on choosing the right bonsai pot before repotting day. Pot size, depth, and drainage style all affect how the tree recovers.
Step-by-Step: How to Repot a Bonsai
Pick a calm, overcast day if possible. Direct sun on freshly pruned roots is stressful. Work in a sheltered spot with everything laid out in advance, because once the tree is out of its pot, the clock is ticking.
- Prepare the pot first. Whether you’re using the same pot or a new one, scrub it clean. Lay plastic mesh over each drainage hole and secure it with a butterfly clip of wire pushed up from below. Thread two anchor wires through the drainage holes so they stick up inside the pot, ready to tie the tree down later.
- Mix and stage your soil. Sift your bonsai soil through a 2mm screen to remove dust. Have a base layer of coarser particles ready (about 5mm) and a finer top layer (2 to 4mm). Akadama, pumice, and lava rock in the ratios discussed below are the standard.
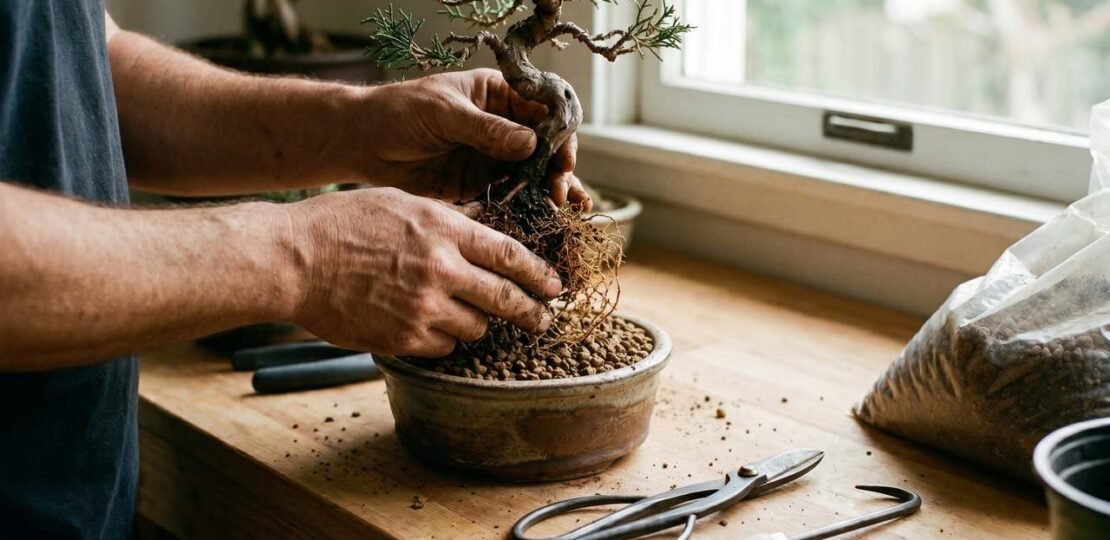
- Remove the tree from its pot. Run a root knife around the inside edge of the pot to free any roots stuck to the walls. Hold the trunk near the base and tilt the pot, easing the root ball out. Never yank. If it resists, work the knife deeper.
- Inspect and comb out the roots. Use a root hook to gently rake outward from the trunk, working in a radial pattern. Loosen the bottom and sides of the root mass first, then the top. You’re trying to expose long roots without ripping the fine feeder roots that do the actual nutrient work.
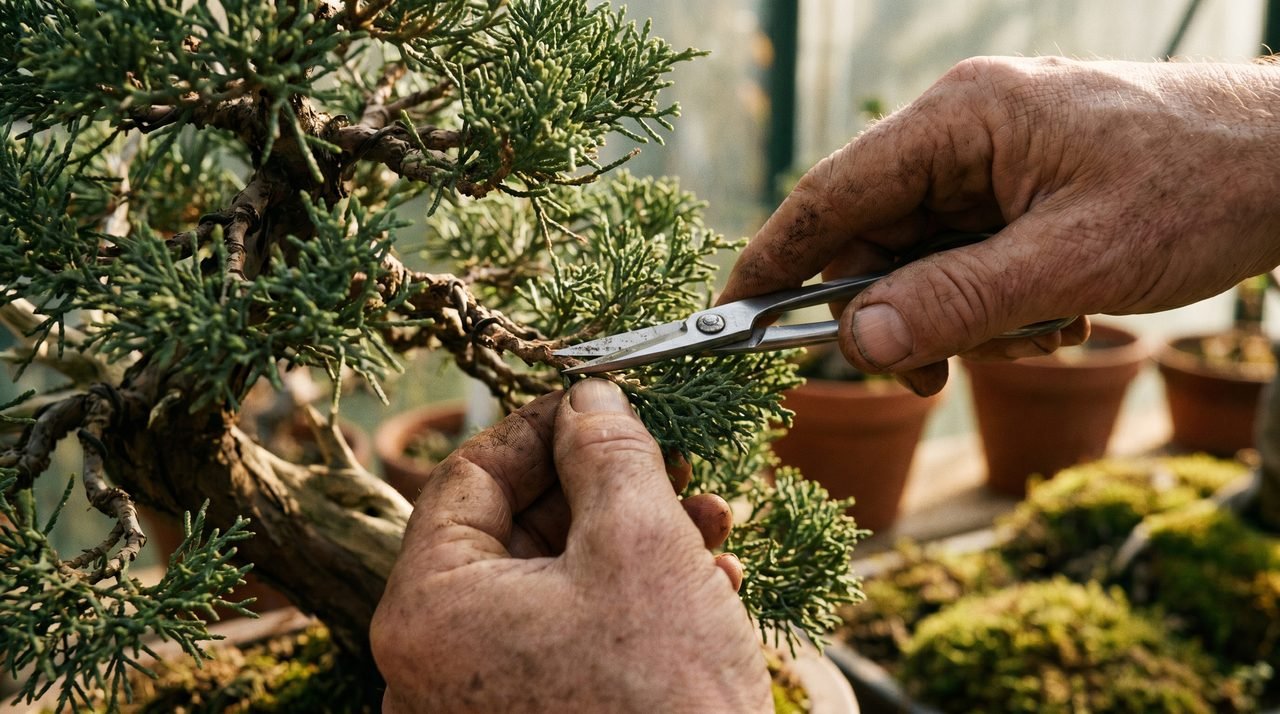
- Prune the roots. Cut back roughly one-third of the total root mass. Remove circling roots, broken roots, and the thickest taproot-style roots that aren’t serving the tree. Keep the fibrous, hair-like feeder roots wherever you can. Use sharp shears for fine work and concave cutters for anything thicker than a pencil.
- Add the base soil layer. Spread a layer of your coarse particles across the bottom of the pot, about 1cm deep depending on pot size. Mound it slightly higher where the trunk will sit so the tree has good drainage under its center.
- Position the tree. Set the tree into the pot, usually slightly off-center for visual balance. The front of the tree should face you. Press down gently and wiggle to seat the root base into the soil mound.
- Tie the tree down. Bring the anchor wires up through the root mass and twist them snugly over the strongest roots. The tree should not move when you push the trunk. A wobbly tree cannot grow new roots properly. This step matters more than beginners think.
- Fill with soil. Add your finer soil mix around and over the root ball. Use a chopstick to work the soil into every gap between roots, pushing gently in vertical motions until you feel no air pockets. The final soil level should sit just below the pot rim.
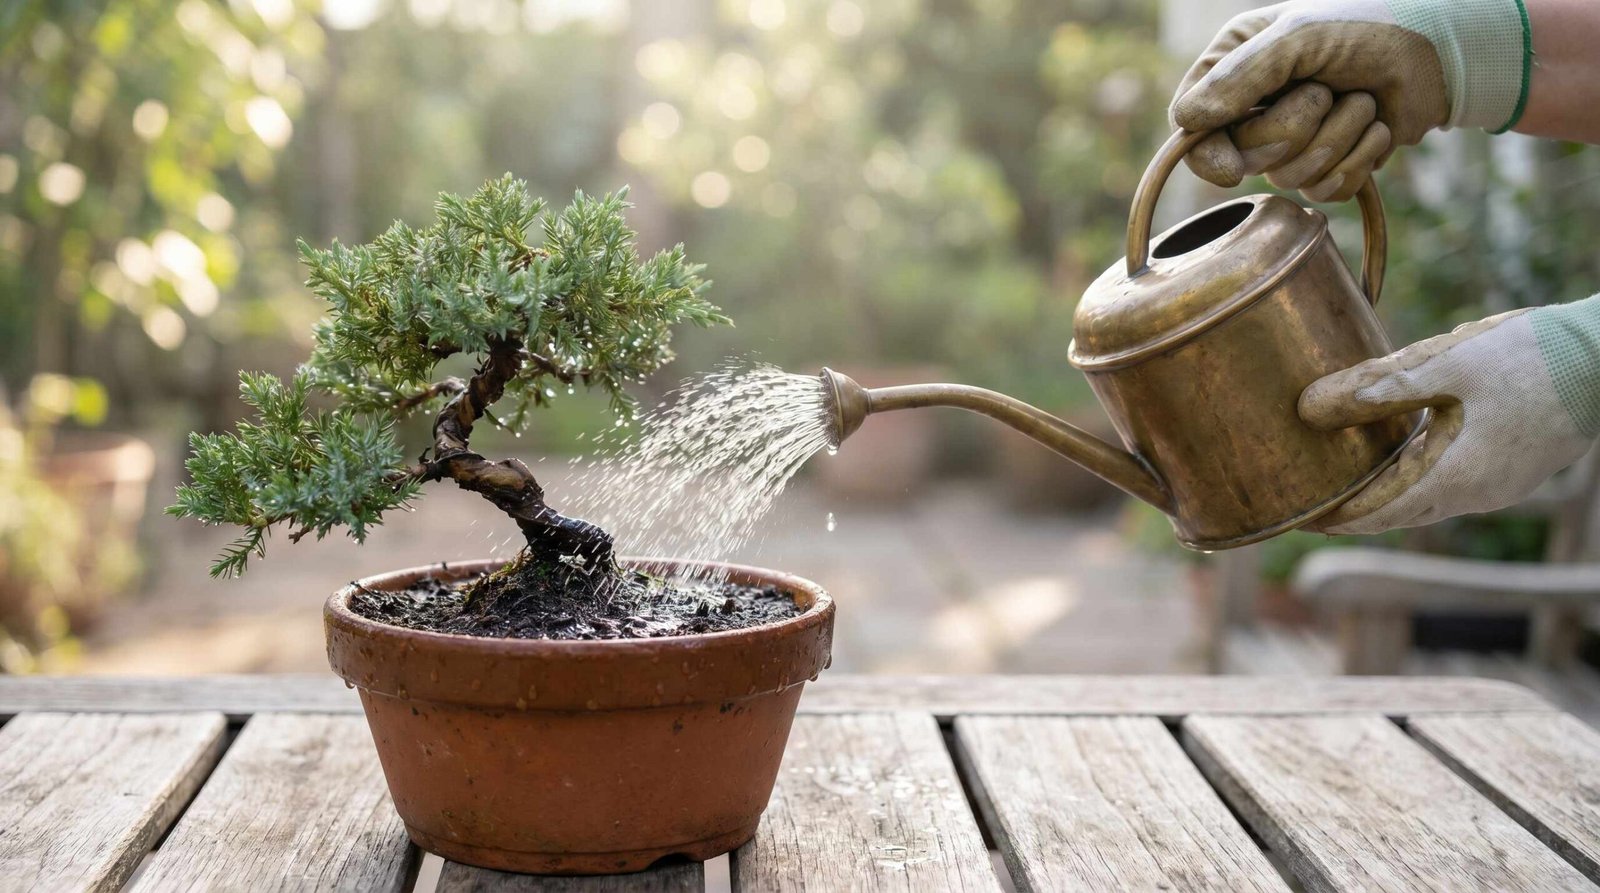
- Water thoroughly. Soak the tree using a fine rose nozzle or watering can until water runs out the drainage holes clear, not muddy. This settles the soil and tells you whether drainage is working. If water sits on the surface, you have a problem to fix now, not later.
- Place in shelter. Move the tree to a shaded, wind-protected spot for two weeks minimum. No fertilizer. No full sun. Just steady moisture and patience.
If this is your first repotting, do it on a vigorous, forgiving species like a Chinese elm or ficus before trying a pine or maple. Confidence comes from successful repetition.
Choosing the Right Soil
Soil is the difference between a tree that thrives for decades and one that quietly declines. Bonsai soil is not dirt. It’s a granular, inorganic mix designed to do three things at once: hold water for the roots to drink, drain excess water fast, and let air reach the root tips. Regular potting soil fails at all three jobs in a bonsai pot.
The three workhorse components, as BonsaiEmpire explains in their substrate guide, are akadama, pumice, and lava rock. Each plays a distinct role.
- Akadama is a Japanese fired clay that holds moisture and breaks down slowly over time, encouraging fine root growth. It’s the most water-retentive component.
- Pumice is a porous volcanic rock that holds water and air in roughly equal balance. It never breaks down, providing long-term structure.
- Lava rock is denser, drains fast, and provides anchor points for roots. It also adds visual texture to the soil surface.
Standard ratios as a starting point:
- Deciduous trees (maples, elms, beech): 50 percent akadama, 25 percent pumice, 25 percent lava rock. More water retention for hungrier growth.
- Conifers (pines, junipers, spruce): 33 percent akadama, 33 percent pumice, 33 percent lava rock. Sharper drainage to match drier-loving roots.
- Tropicals (ficus, jade, Brazilian rain tree): 50 percent akadama, 30 percent pumice, 20 percent lava rock, plus a small percentage of fine bark for organic content.
- Azaleas: 100 percent kanuma, a softer acidic clay that suits their pH preferences.
If you’re starting out and don’t want to mix your own, a pre-blended “all-purpose bonsai soil” from a reputable supplier will keep most species healthy for years. Mix your own once you’ve got the fundamentals down and start noticing what your trees prefer.
Aftercare: The First 4 Weeks After Repotting
Your tree has just had major surgery. Treat it like a patient, not a houseplant.
Week 1. Place the tree in a shaded, wind-free spot. Bright indirect light is ideal. Water only when the top centimeter of soil starts to feel dry, then water thoroughly. The roots are damaged and cannot uptake water efficiently, so overwatering is the biggest risk in the first week. Do not fertilize.
According to Clemson Cooperative Extension research on transplanting stress, freshly disturbed root systems are most vulnerable to drying winds and direct heat in the first 7 to 10 days. Shelter matters more than people realize.
Week 2. Continue shaded placement. Watch for new bud swell or leaf emergence, which is your sign that the roots have begun to recover. Still no fertilizer. Water as needed, checking daily.
Week 3. Move the tree to morning sun, afternoon shade. Begin reintroducing it to airflow gradually. If you see vigorous new growth, you’re past the danger zone. If the tree looks limp or leaves are dropping unexpectedly, return it to deeper shade and check soil moisture.
Week 4. Resume normal light placement for the species. Begin light fertilizing with a half-strength organic feed. Full-strength fertilizer can wait another two weeks. This is also the time to resume light pruning your bonsai, though heavy structural work should wait until the next growing season.
Recovery times vary by species and tree health. A young, vigorous Chinese elm may show new shoots within ten days. A mature pine may not show meaningful new growth for two months. Patience is the discipline that separates good bonsai owners from frustrated ones.
Common Repotting Mistakes to Avoid
- Repotting at the wrong time of year. The single most common killer. A tree repotted in midsummer or deep winter often cannot generate the new roots it needs to survive. Stick to the species timing table above and watch your local weather.
- Bare-rooting healthy conifers. Pines and junipers depend on a fungal partner called mycorrhizae living inside their root mass. Washing away all the soil destroys this fungus and can take the tree with it. Leave at least half the original root mass intact on conifers.
- Using regular potting soil. Garden center “bonsai soil” is often just bagged peat and bark. It compacts within months, suffocating roots. Spend the extra few dollars on real granular bonsai substrate.
- Skipping the tie-down wires. A tree that wobbles in its pot cannot grow new roots. Every breath of wind tears the fragile new feeder roots. Anchor wires are not optional.
- Fertilizing too early. Fresh wounds plus nitrogen equals burn. Wait until you see new growth before reintroducing fertilizer, and start at half strength.
Frequently Asked Questions
How often should you repot a bonsai?
Most bonsai need repotting every 2 to 3 years, but the frequency depends on species, age, and pot size. Young, vigorous trees in development may need annual repotting, while mature refined trees can go 4 to 5 years. Check for the diagnostic signs each late winter rather than repotting on a calendar.
Can I repot a bonsai in summer?
For most species, no. Summer heat puts massive demand on roots, and a freshly pruned root system cannot keep up with water demand. Tropical species like ficus and jade are exceptions and actually prefer warm-weather repotting. Temperate species (maples, pines, junipers) should wait for late winter or early spring.
What soil should I use for repotting bonsai?
Use a granular, inorganic bonsai soil mix containing akadama, pumice, and lava rock. Standard ratios are 50/25/25 for deciduous trees and 33/33/33 for conifers. Avoid general potting soil, which compacts and suffocates roots. Pre-mixed bonsai substrate from a reputable supplier works well for beginners.
How long does bonsai repotting recovery take?
Visible recovery usually takes 2 to 4 weeks, marked by new bud swell or leaf emergence. Full root regeneration takes a full growing season. Vigorous species like Chinese elm may show new growth within 10 days. Pines and other conifers can take 6 to 8 weeks to show meaningful recovery.
Do I need special tools to repot bonsai?
You can technically repot with scissors and a fork, but proper tools make the job dramatically easier and safer for the tree. At minimum, invest in root shears, a root hook, drainage mesh, and bonsai chopsticks. Concave cutters and a turntable become valuable as your collection grows.
Repotting is one of those rituals that connects you to your tree more deeply than almost anything else you’ll do. You’ll see the roots, feel the soil, and learn what your specific tree wants. Take your time, follow the signs, and trust the process. Your bonsai will reward the care for years to come.
RELATED POSTS
View all