Pine Bonsai Care: Complete Guide to Growing and Styling Pine Bonsai
May 14, 2026 | by Ian
Pine Bonsai Care: The Complete Guide to Growing and Styling Pine Bonsai
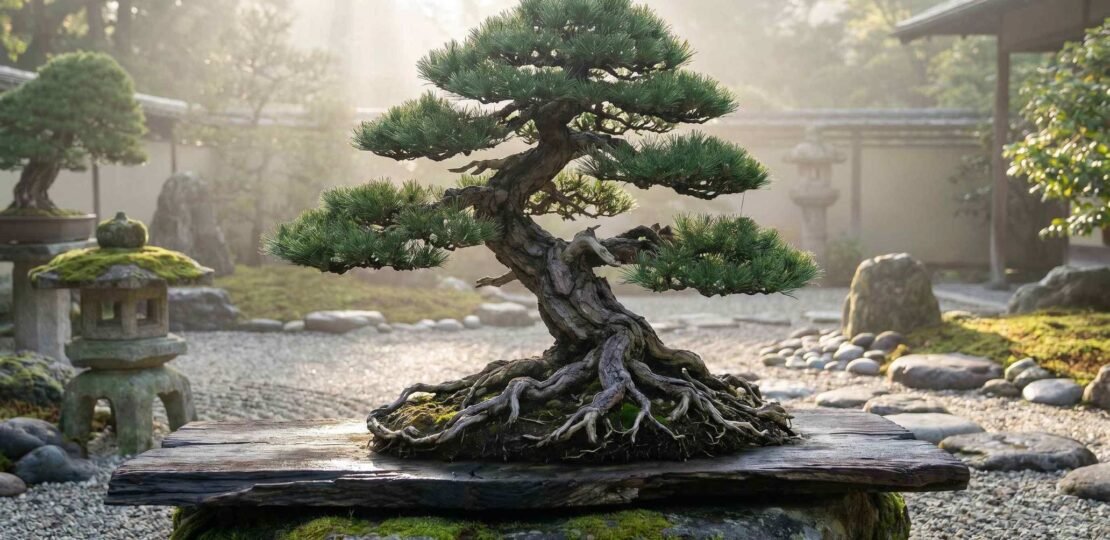
Pine bonsai are the soul of classical Japanese bonsai practice, trees whose gnarled trunks, jagged branching, and dark winter silhouettes have inspired masters for centuries. They are also, honestly, more demanding than the junipers and ficus most newcomers start with, and the single technique that separates beautiful pines from struggling ones is candle management. Once you understand when, where, and how to handle those spring candles, every other part of pine care begins to make sense.
Pine bonsai need full sun outdoors year round, water only when the topsoil starts drying (pines tolerate brief dryness far better than junipers), a free-draining inorganic soil mix, annual candle management timed to the species, and a true winter dormancy. Pines are not indoor trees. Get those five fundamentals right and ramification, short needles, and aged bark will follow over the years.
Which Pine Do You Have? Species Identification and Differences

Before you touch a candle or pick up a pair of scissors, you need to know what species you are working with. The same technique, applied on the same calendar date, can refine one pine and weaken another. Pines fall into two broad horticultural camps for bonsai purposes: multi-flush species, which can be decandled to produce a second flush of shorter needles in summer, and single-flush species, which produce only one growth cycle per year and must be pinched, not decandled. Bonsai Mirai’s pine identification guide classifies pines by water mobility, which is the underlying reason for the flush difference.
Japanese Black Pine (Pinus thunbergii), the gold standard
Japanese Black Pine is the king of bonsai conifers and the species most often photographed in masterpiece collections. It is an aggressive, vigorous grower, a true two-flush species, and the reason decandling exists as a technique. Needles emerge in dense pairs, dark green and somewhat stiff. The bark develops deep, rugged plates with age, often considered the most beautiful in the genus. If a guide tells you to remove every spring candle in July, that guide is talking about Japanese Black Pine. Apply the same advice to a Scots Pine and you will damage the tree.
Japanese White Pine (Pinus parviflora)
Japanese White Pine is a single-flush species with shorter, blue-green needles in bundles of five. It grows more slowly than Black Pine, develops mature bark only after decades, and is exceptionally elegant. Because the species struggles on its own roots in many climates, most commercial Japanese White Pines are grafted onto Japanese Black Pine rootstock. Inspect the lower trunk of any White Pine you buy. A visible graft union can be aesthetically distracting, and the rootstock will sometimes push its own buds, which must be removed to keep the variety pure.
Scots Pine (Pinus sylvestris)
Scots Pine is native to a huge sweep of Europe and northern Asia. It is utterly cold-hardy, tolerates poor soils, and develops a beautiful orange-red to flaking copper bark on older specimens, one of the most distinctive features of any pine bonsai. It is a single-flush species, so candle pinching, not decandling, is the appropriate refinement technique. Scots Pine is a strong candidate for beginners in temperate climates because it forgives more than Black Pine and is widely available as nursery stock or yamadori.
Mugo Pine (Pinus mugo)
Mugo Pine is a dwarf alpine pine that grows naturally low and compact, sometimes barely above shrub height in the wild. It is single flush, very cold-hardy, inexpensive to source at garden centers, and unfussy. For a first pine, we suggest a Mugo: you can practice wiring, pinching, and seasonal pruning without the high stakes of an expensive White Pine. Needles are medium length and tend to shorten with proper culture.
Pine species comparison
| Species | Needle length | Cold hardiness | Candle flushes | Beginner-friendly | Best feature |
|---|---|---|---|---|---|
| Japanese Black Pine | 3 to 5 inches, reducible | USDA 5 to 9 | Two flushes | Intermediate | Rugged plated bark |
| Japanese White Pine | 1.5 to 2.5 inches | USDA 4 to 7 | Single flush | Intermediate to advanced | Blue-green five-needle clusters |
| Scots Pine | 1.5 to 3 inches | USDA 3 to 7 | Single flush | Beginner to intermediate | Orange-red flaking bark |
| Mugo Pine | 1 to 2 inches | USDA 2 to 7 | Single flush | Beginner | Naturally compact growth |
Sunlight, Climate, and Placement
Every pine on this list requires full sun, at minimum six hours of direct sunlight daily, and ideally more. Pines evolved on exposed slopes and ridgelines. They photosynthesize through tough, waxy needles and they need the energy. Shade-grown pines produce long, leggy needles, weak buds, and chronic fungal issues.
All pines must be kept outdoors year round. They are not indoor plants. Bringing a pine inside for more than a few days, even in winter, disrupts dormancy, invites pests, and almost always leads to slow decline. If someone sold you a pine bonsai as an indoor tree, they were wrong.
Winter dormancy is non-negotiable. Pines need a chill period of at least several weeks below 40 degrees Fahrenheit to cycle properly. Mugo and Scots Pine shrug off temperatures well below zero. Japanese Black Pine begins to suffer root damage in bonsai pots below roughly 20 degrees Fahrenheit, so protect the root mass once temperatures dip into the teens by mulching the pot, moving the tree to an unheated garage or cold frame, or sinking the pot into the ground. White Pine sits between the two extremes. Whatever your climate, the goal is cold dormancy without frozen roots.
If you are still mapping out where to place your collection, our general bonsai tree care guide covers placement and seasonal positioning that applies across species.
Watering Pine Bonsai
Pines are more drought-tolerant than the junipers, ficus, and tropicals most beginners cut their teeth on. They prefer the topsoil to dry out partially between waterings. Constant saturation is the single most common way newcomers kill a pine. Roots starved of oxygen rot, fungal pathogens move in, and by the time you see needle symptoms the tree is often beyond saving.
The practical rule: probe the soil surface with a chopstick or your finger. When the top half-inch feels dry and the chopstick comes out clean, water thoroughly until water runs freely from the drainage holes. Then wait again. In hot midsummer you may water daily. In cool spring and autumn, every two to four days is common. In winter dormancy, watering can drop to once every one to two weeks depending on humidity and temperature.
Signs of overwatering: older interior needles yellow and fall prematurely, the soil surface stays dark and shiny, roots feel soft and smell sour at repotting. Signs of underwatering: needle tips brown and become brittle, the soil surface lifts away from the pot edge, the entire mass feels suspiciously light. Pines tolerate brief underwatering better than chronic overwatering, but neither is acceptable for the long term.
Candle Management: The Technique That Defines Your Pine
What are pine candles and why they matter for bonsai development
In spring, pines push new growth as elongated cylindrical buds called candles, named for their appearance before the needles extend. Inside each candle are next year’s needles, internodes, and the buds that will form future branches. Controlling what happens to those candles is how bonsai artists build ramification, shorten internodal length, and trigger back-budding deeper inside the canopy. A pine that is never managed at the candle stage grows long, leggy, and bare in the interior. A pine managed correctly for years develops fine, dense pads of short needles with branching that fills the silhouette.
Timing: the most common beginner mistake
Here is where most beginners go wrong, and where the species you have determines everything.
Japanese Black Pine (two-flush): After the spring flush hardens, typically late June through mid-July in temperate Northern Hemisphere climates, the entire spring candle is cut off at the base. This severe technique, called decandling, forces the tree to push a second, much smaller flush from latent buds. The result is shorter needles, more buds, and tighter ramification. Strong trees decandle earlier in the window; weaker trees wait until later or skip a year entirely. Bonsai Mirai’s species classification stresses that only multi-flush pines should be decandled, because only they have the water mobility to recover and push a second flush in the same year.
Japanese White Pine, Scots Pine, Mugo Pine (single-flush): Never decandle these species. They cannot push a second flush in the same season, and removing the candles destroys an entire year’s growth. Instead, pinch the candles in spring, typically late April through May, while they are still soft and roughly half to fully extended but before the needles have separated. Use thumb and forefinger to pinch off a portion of the candle. Strong candles get more removed (up to two thirds), medium candles get half, weak candles are left alone. This balances vigor across the tree without destroying the year’s growth.
Getting the timing wrong on Black Pine, decandling too early, yields oversized summer needles. Decandling too late means the second flush will not harden before autumn. On single-flush species, decandling at all is the mistake.
How to pinch versus cut, and why it matters
Pinching with your fingers leaves a soft, crushed end that the candle can seal over without damaging adjacent needles. Cutting with scissors slices through any needles that happen to overlap the candle base, and those cut needle tips will brown over the next several weeks, leaving brown points all across your tree. Use scissors only when the candle is too thick or stiff for fingers, and angle the cut carefully to avoid clipping nearby needles.
Partial candle removal versus complete removal
Pines distribute energy unevenly. The top and outer branches are stronger because they receive more light. Left alone, that imbalance grows worse year after year until the bottom of the tree dies back. Selective candle work corrects it:
- Weak branches (typically lower interior): leave the full candle so the branch can build strength.
- Medium branches: pinch back to roughly half.
- Strong branches (apex and outer tips): remove the candle entirely, or on single-flush species pinch most of it.
This transfers energy from strong areas to weak ones over the season. Done annually, it produces a tree of remarkable evenness.
Needle Reduction Techniques
Show-quality pines have needles dramatically shorter than the same species growing wild. This is not magic and it is not the variety. It is the cumulative effect of candle management plus careful needle work over many years.
On Japanese Black Pine, the cycle is: decandle in summer to produce shorter second-flush needles, then in autumn pull a percentage of the old needles by hand. Removing the previous year’s needles, especially the oldest pairs at the base of each shoot, opens up light to interior buds and triggers back-budding for the following spring. The general rule is to leave more needles on weak branches (perhaps 10 to 12 pairs) and fewer on strong branches (perhaps 5 to 7 pairs), again balancing vigor.
To remove old needles, grip the needle pair at the base and pull straight down along the shoot. They should come off cleanly. If they resist, leave them: ripping out an attached fascicle can damage the bud beneath.
Back-budding, the appearance of new buds along older wood, is the holy grail of pine refinement. It only happens when light reaches the interior, when the tree is healthy, and when energy is balanced. You will start to see small reddish buds along previously bare branches after one or two seasons of consistent work, and these become your next generation of fine branching.
On single-flush species, needle reduction comes more slowly and gently. Pinch candles in spring, prune long shoots back in autumn after they have hardened, and reduce older needles sparingly. Do not strip a single-flush pine the way you might strip a Black Pine, the tree cannot recover from that level of intervention.
Pruning and Wiring
Pruning timing
Major structural pruning, the kind where you remove a whole branch, is best done in autumn after the growing season settles, typically October through November. Sap flow has slowed, the tree is preparing for dormancy, and resin will seal cuts faster. Avoid heavy pruning in spring when the tree is mobilizing stored energy into new growth; cuts made then bleed sap and stress the tree at the worst possible moment.
For minor refinement and short twig pruning, late winter through very early spring also works, just before bud break.
For broader pruning fundamentals across species, our guide on how to prune a bonsai tree covers cut placement, sealants, and post-pruning care.
Wiring technique
Anodized aluminum wire works well for most pine bonsai. Copper holds shape better and is preferred for thicker branches on advanced trees, but aluminum is easier for beginners. Apply wire in autumn, when the bark is most visible after some old needles have been removed and you can see exactly where you are placing each turn. Wire pitch should be roughly 45 degrees, and wire diameter should be about one third the diameter of the branch being shaped.
Pine bark scars easily. Protect thick branches with raffia (soaked first) wrapped around the wood before applying wire. Check wires monthly during the growing season. The moment you see wire beginning to bite into the bark, remove it immediately. A wire scar on a pine takes years to grow out, and on prominent branches it never fully disappears. Most wire should come off within one growing season; particularly thick branches sometimes need a second application.
Soil, Repotting, and Fertilizing
Ideal soil mix
Pines demand exceptional drainage and aeration. The classic mix is roughly 40 percent akadama, 40 percent pumice, and 20 percent lava rock (kiryu), sieved to remove dust and to grade particle size to the pot. The akadama holds moisture and breaks down to encourage fine roots, the pumice maintains aeration, and the lava rock provides structural drainage. Avoid potting soils, peat-based mixes, and anything described as “moisture-retentive.” Pine roots need oxygen as much as they need water, and a soggy mix is a death sentence.
Repotting timing and frequency
Repot pines in early spring, just as the buds begin to swell but before they elongate. The tree is leaving dormancy with stored energy ready to drive recovery. Repotting in summer or autumn is a significant risk.
Young pines in development: every two to three years. Mature pines in refinement: every three to five years. Very old, very stable trees in shallow pots may go five to seven years between repots, especially Japanese White Pine.
One absolute rule: never repot and decandle the same Japanese Black Pine in the same year. Doing both severely depletes the tree’s reserves and will weaken or kill it. Pick one intervention per year. The same caution applies to heavy pruning in a repotting year.
Fertilizer schedule
Pines respond strongly to fertilizer, and you can shape your tree’s behavior partly through what you feed and when:
- Spring: higher nitrogen to drive the spring flush. Apply as buds break and continue weekly with liquid feed, or monthly with solid organic cakes, through mid-spring.
- Early summer (Black Pine only, before decandling): reduce or pause fertilizer two to four weeks before decandling so the spring flush does not over-extend.
- Mid to late summer: resume balanced fertilizer to support the second flush on Black Pine, or to continue building strength on single-flush species.
- Autumn: switch to low-nitrogen, higher phosphorus and potassium to harden new growth for winter. Stop fertilizing entirely four to six weeks before your first hard frost.
Avoid heavy nitrogen feeding late in the season. It encourages soft, late-season growth that will not harden before winter and is highly vulnerable to dieback.
Common Pine Bonsai Problems
Even with perfect care, problems happen. The trick is recognizing them early.
Needle cast (fungal): Several fungi infect new needles in spring and become visible months later when older needles yellow, brown, and drop prematurely. The University of Maryland Extension’s overview of needle cast diseases on evergreens notes that Lophodermium, Ploioderma, and Cyclaneusma are the most common pine pathogens and that Scots Pine in particular is susceptible. Prevention: good airflow around the tree, no overhead watering once new needles are extending, prompt removal of fallen infected needles. Treatment: protective fungicide on emerging spring needles for trees with a history of infection.
Spider mites: Tiny pests that thrive in hot, dry, dusty conditions. Symptoms include fine stippling on needles, a dusty grey cast to the foliage, and tiny webbing on the underside of branches in heavy infestations. Hose the tree down thoroughly several times a week in hot weather as a deterrent, and use horticultural oil or insecticidal soap if mites appear.
Root rot: Almost always caused by overwatering, dense soil, or both. Symptoms appear top-down as needle yellowing and dieback that does not respond to any other intervention. By the time you see clear top-side symptoms, the root system is usually severely compromised. Prevention is essential: use proper soil, water by need rather than schedule.
Pine wilt nematode: A devastating disease caused by the pinewood nematode, vectored by sawyer beetles, that can kill a pine within months. It is established across the US, Japan, Korea, and parts of Europe. Symptoms are dramatic: rapid wilting and browning of an entire tree, often in late summer, with little resin flow when branches are cut. There is no cure for an infected tree. Black Pine is among the most susceptible species, Scots Pine and other exotics in affected regions are also vulnerable. Buy nursery stock from reputable sources and quarantine new pines briefly before introducing them to your collection.
Pine needle scale: Small white, oyster-shell-shaped scales on the needles. They suck sap and weaken the tree. Treat with horticultural oil in late winter and follow up with targeted treatment during the crawler stage in spring.
Frequently Asked Questions
Can pine bonsai be kept indoors?
No. Pines are temperate-climate trees that need full sun, fresh air, and a real winter dormancy. Indoors they slowly decline from inadequate light, poor air movement, and the absence of seasonal cues. A pine on an indoor windowsill is a pine on a slow timer.
How often should I water a pine bonsai?
Water when the topsoil starts to dry, not on a fixed schedule. In hot summer that may be daily; in cool autumn perhaps every three days; in winter dormancy every one to two weeks. Probe the soil before watering and trust the soil, not the calendar.
When do I repot a pine bonsai?
Early spring, just as the buds begin to swell but before they elongate. Young trees every two to three years, mature trees every three to five years. Never combine repotting and decandling on the same Black Pine in a single season.
Why are my pine bonsai needles turning yellow?
Some yellowing is normal: pines naturally shed their oldest interior needles in autumn, and this can be alarming the first time you see it. Problem yellowing involves the current year’s needles, often from overwatering, root rot, fungal needle cast, or a nutrient deficiency in chronically depleted soil. If only the oldest needles closest to the trunk are yellowing in autumn, you are fine.
How long does it take to develop a pine bonsai?
Honestly, decades. A respectable bonsai from a nursery starter takes ten to fifteen years of consistent work. Show-quality pines often represent forty to a hundred years of accumulated culture. This is part of why pine bonsai are revered: they reward patience at a scale most other gardening does not.
If you are looking for faster gratification while building your skills, our guides on juniper bonsai care and jade bonsai care cover species that develop more quickly, while many of the underlying principles, sun, water, soil structure, transfer back to your pines.
Stay with pines and you will learn more about plant physiology than from any other bonsai species. Decandling, candle pinching, needle pulling, and the long calendar of small interventions are the most rewarding skills in the craft. Take it one season at a time, watch your tree, and remember that even the most experienced masters were once beginners squinting at a candle and wondering if it was the right day.