How to Wire a Bonsai Tree: Step-by-Step Guide for Beginners
Quick Answer: Wiring a bonsai tree involves wrapping annealed copper or aluminum wire around branches at a 45-degree angle to bend and hold them in the desired position. Choose a wire gauge roughly one-third the thickness of the branch, anchor it firmly to a thicker branch or the trunk, then wrap with even spacing before gently bending. Remove the wire before it cuts into the bark, usually within three to twelve months.
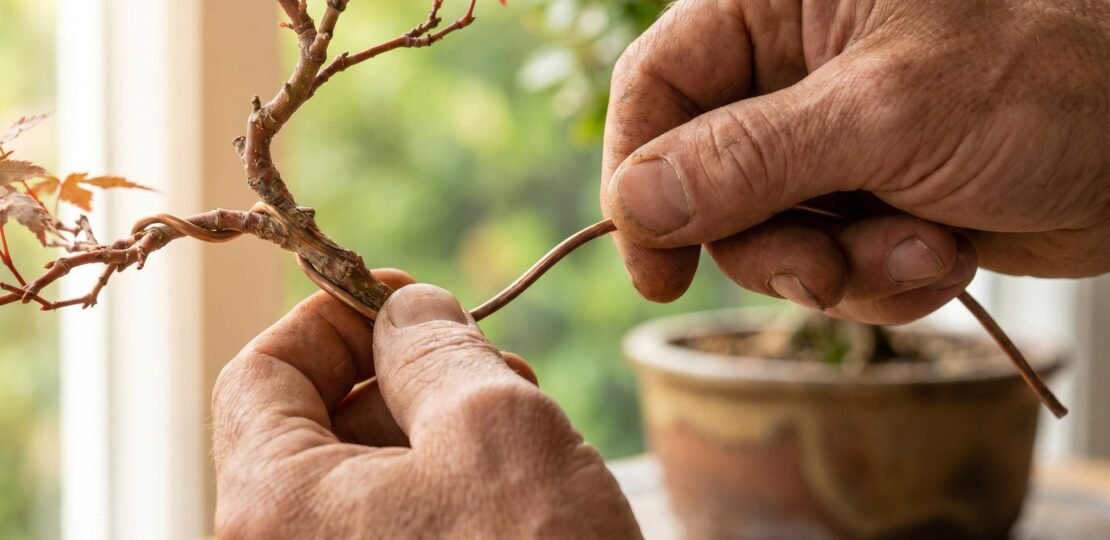
Wiring is the technique that turns a young, leggy nursery tree into a sculpted bonsai with character. It lets you reposition branches, create movement, and reveal the design hidden inside a plant. The good news is that wiring is a learnable craft, not a mysterious art. Once you understand a handful of principles, mainly the right wire choice, the 45-degree wrapping angle, and patient bending, you can shape almost any species with confidence.
This guide walks you through every decision and motion involved in wiring a bonsai tree. You will learn why we wire in the first place, how to choose between aluminum and copper, which gauge fits your branch, the tools that make the job clean, and a numbered step-by-step routine you can repeat on every tree you own. We also cover species-specific timing, when to remove the wire, common beginner mistakes, and the questions readers ask most often.
Why We Wire Bonsai Trees
Bonsai design is the slow conversation between the artist and the tree. Pruning removes what you do not want. Wiring positions what remains. Without wiring, you are limited to whatever direction the branches naturally chose to grow, and most nursery stock grows straight up toward the light.
Wiring serves three core purposes. First, it creates movement, the gentle curves and angles that make a small tree look like an ancient specimen in a mountain landscape. Second, it allows you to fill empty spaces in the canopy by lowering or raising branches into the correct position. Third, it helps you set the silhouette of the tree, the outline a viewer sees from a few steps away.
A wired branch slowly remembers the new position. As it grows in place, the cells in the wood lay down new fibers that lock the shape, even after the wire comes off. This is why patience matters more than force. You are training the tree, not bending it into submission.
If you are still building out your toolkit for general tree care, our complete bonsai tree care guide covers the watering, feeding, and light fundamentals that keep a wired tree healthy through the styling process.
Aluminum vs. Copper Bonsai Wire: Which Should You Use?
The first real decision you face at the workbench is which metal to buy. Both aluminum and copper work, and both are used by professional artists every day. They behave differently, though, and matching the wire to the species and the practitioner saves a lot of frustration.

Aluminum bonsai wire is anodized, usually a dark brown color so it blends with bark. It is soft, easy to apply, and forgiving when you make a mistake. Copper wire is annealed (heated and slowly cooled) to soften it, then hardens as you work it around the branch. This work-hardening property gives copper extra holding power, but it also means you get one chance to apply it correctly before the wire becomes stiff.
| Feature | Aluminum | Copper |
|---|---|---|
| Difficulty | Beginner-friendly, easy to wrap and re-wrap | Intermediate, less forgiving once applied |
| Best Species | Deciduous and tropical trees: ficus, Japanese maple, elm, jade | Conifers and stiff branches: pine, juniper, spruce |
| Stiffness | Softer, bends easily by hand | Harder, holds heavy branches without slipping |
| Price | Lower cost per foot | Roughly two to three times the cost of aluminum |
| Gauge for Beginners | 2.0 mm to 3.0 mm for most secondary branches | 1.5 mm to 2.0 mm to achieve the same holding strength |
| Holding Power | Moderate, may need to be reapplied for set bends | High, work-hardens to grip stubborn branches |
For your first ten trees, we suggest aluminum. It teaches you how to wrap, how to feel for tension, and how to recognize when a branch is set, all without punishing small errors. Move to copper once you start wiring mature pines and junipers where holding strength matters more than ease of application. For more detail on metal selection and grades, our deep dive on bonsai wire compares specific brands and storage tips.
Choosing the Right Wire Gauge
Wire is sold by gauge, measured in millimeters of diameter. Pick a gauge that is too thin and the branch springs back. Pick one too thick and you wrestle with the wire, risk snapping the branch, and leave scars in the bark.
The simplest guideline is the Rule of One-Third: choose a wire whose diameter is roughly one-third the thickness of the branch you intend to bend. A pencil-thick branch (about 6 mm) bends well with 2.0 mm wire. A thumb-thick branch needs something closer to 4 mm.
This is a starting rule, not a law. Brittle species like Japanese maple may need one step thicker because you bend in smaller increments. Flexible species like juniper can sometimes use one step thinner. If a single wire is not strong enough, the answer is rarely to jump to a much thicker gauge. Instead, apply two parallel wires of the same size, a technique called double wiring, which doubles the holding power without making the wrap unwieldy.
Quick Gauge Reference Chart
| Branch Thickness | Aluminum Wire Gauge | Copper Wire Gauge |
|---|---|---|
| 2 mm (small twig) | 1.0 mm | 0.8 mm |
| 4 mm (pencil tip) | 1.5 mm | 1.0 mm |
| 6 mm (pencil) | 2.0 mm | 1.5 mm |
| 9 mm (marker) | 3.0 mm | 2.0 mm |
| 12 mm (thumb) | 4.0 mm | 3.0 mm |
| 18 mm or more | 5.0 mm or double-wire | 4.0 mm or guy-wire |
Stock three or four gauges to start. Most beginners do well with 1.0 mm, 1.5 mm, 2.0 mm, and 3.0 mm aluminum. That covers small interior twigs up through medium secondary branches.
Tools You Need Before You Start
Wiring requires fewer tools than most bonsai operations, but the right pair of pliers and cutters protects both you and the tree.
- Wire cutters: Knob, or jin, cutters designed for bonsai cut wire flush against the bark without crushing tissue. Standard household cutters work in a pinch but leave sharp stubs.
- Bonsai pliers: Flat-nose jin pliers grip and bend wire near the trunk where fingers cannot reach.
- Multiple wire gauges: Have a range on hand so you do not stop mid-project to order more.
- Raffia or self-amalgamating tape: Used to wrap thick branches before bending, protecting bark from cracking.
- A turntable: Optional but useful, allowing you to rotate the tree without lifting and risking branch contact.
- Sharp scissors: For trimming dead foliage that gets in the way of clean wire passes.
If you are still assembling your kit, our guide to beginner bonsai tools walks through which purchases are worth making first and which can wait until you have more trees.
How to Wire a Bonsai Tree: Step-by-Step
What follows is the routine we teach in introductory classes. Read it once before you pick up the wire, then keep the page open as a reference for your first few attempts.
- Prepare the tree and the workspace. Water the tree the day before wiring, not the morning of. Slightly dehydrated branches are more flexible and less prone to snapping. Clear your bench, lay out your wire by gauge, and place cutters and pliers within easy reach.
- Plan the design before cutting any wire. Spend at least five minutes turning the tree on its turntable. Identify the front, the apex, the main branches, and any structural lines you want to keep. Decide where each branch should end up before you wrap anything.
- Start from the trunk and work outward. Always wire the largest, most central branch first, then move to the secondary branches, and finish with the small twigs. Working from thick to thin keeps your gauge logic consistent and avoids tangling.
- Cut a length of wire about one-third longer than the branch. Extra length is forgiving. Wire that is too short forces you to splice mid-branch, which weakens the hold.
- Anchor the wire to a stable point. Push the end of the wire into the soil next to the trunk, or wrap it once around a thicker branch or the trunk itself. The anchor must not move when you apply pressure further out, or the whole wrap loosens.
- Wrap at a consistent 45-degree angle. This is the most important rule of wiring. A 45-degree angle gives the wire enough turns to hold the branch while still allowing the wood to expand slightly as it grows. Steeper angles slip. Shallower angles cut into the bark quickly.
- Keep the wraps evenly spaced. Aim for a spiral that looks like the threads on a screw, not crowded near the base and loose at the tip. Use one hand to feed the wire and the other to brace the branch so you never pull against the bark.
- Use the double-wiring technique for paired branches. When two branches emerge from the trunk near the same point, run a single wire from one branch, around the trunk, and out the second branch. This anchors both at once and uses fewer separate pieces.
- Bend immediately after wrapping, while the wire is fresh. Place your thumbs on the outside of the curve and your fingers on the inside. Bend with the pads of your thumbs, not the tips, and move in small increments. Listen and feel for cracking. If you hear a snap, stop and assess.
- Apply guy-wires for thick or stubborn branches. When a branch is too thick to bend with wrapped wire alone, attach a length of wire to the branch at one end and to a stable anchor (the pot rim, a root, or another branch) at the other. Tightening the guy-wire pulls the branch into position over weeks. Pad the contact points with rubber tubing so the wire does not score the bark.
- Reposition smaller branches and twigs last. Once the structural lines are set, refine the canopy by wiring smaller branches to fill empty space and create depth. These finer wires can usually be applied and bent in a single motion.
- Step back and review every few minutes. Bonsai design is a long-distance art. Move three or four steps away from the tree, look at the silhouette, and adjust before the wire sets the shape in your memory.
For a visual walkthrough of advanced bending techniques, the detailed wiring guide from Bonsai Empire includes time-lapse video of professional artists applying these same steps on mature specimens.
Wiring Timeline by Species
Different species hold the bend at very different speeds. Wiring a juniper too briefly is a waste of effort. Wiring a Japanese maple for too long produces ugly scars that last years. Use this table as a planning aid, then watch each branch carefully.
| Species | Typical Wire Duration | Best Season to Apply |
|---|---|---|
| Ficus | 2 to 4 months | Late spring through summer, during active growth |
| Juniper | 6 to 12 months | Late autumn or early winter, when sap flow is low |
| Japanese Maple | 3 to 6 weeks | Late winter before bud break, or after leaves harden in early summer |
| Pine | 8 to 14 months | Autumn after candle hardening, before heavy frost |
For more on tropical species that tolerate indoor wiring year-round, see the species care profiles covering ficus, jade, Chinese elm, and similar resilient trees.
When and How to Remove the Wire
Removing wire on time matters more than almost any other step in the process. A branch that has grown around the wire is scarred for years, and on some species the scar never disappears. Check every wired branch at least once a week.
Warning Signs of Wire Bite
- Bark begins to swell on either side of the wire.
- The wire looks slightly recessed into the wood, not sitting on top of it.
- You can no longer slide a fingernail under the wire at any point along the spiral.
- The branch has visibly thickened since the wire was applied.
The moment you notice any of these signs, remove the wire that same day, even if the bend has not fully set. You can always rewire the branch a few weeks later. You cannot replace a scarred section of bark.
Cutting vs. Unwinding
There are two ways to remove wire. Cutting is faster and safer for the tree: use wire cutters to snip the spiral at every turn, then peel the small pieces off. The wire is sacrificed, but no force pulls against the bark. Unwinding is unwinding the wire by reversing the direction you applied it. This saves the wire for reuse but stresses the bark and is only practical on smooth, young branches with no swelling.
For mature trees and any branch that shows early wire bite, always cut. The few cents of wire you save by unwinding are not worth a permanent scar.
Common Wiring Mistakes and How to Avoid Them
Most beginner problems trace back to a small number of habits that are easy to correct once you notice them.
- Wrapping at the wrong angle. Wraps that look nearly parallel to the branch slip off. Wraps that look like rings cut in. Aim for the 45-degree spiral every single time.
- Using too thin a wire and adding more later. Layering thin wire on top of thin wire is messy and uneven. Use the right gauge from the start, or double-wire with two parallel passes of the same gauge.
- Wiring a stressed tree. Never wire immediately after repotting, after heavy pruning, or during the hottest weeks of summer. A tree that is healing or struggling cannot also handle the stress of being shaped.
- Bending too far too fast. A branch that snaps is rarely saveable. Move in small increments, hold the bend for a few seconds, then move further if the wood allows.
- Forgetting about the wire. Set a calendar reminder for two weeks after wiring, then weekly after that. Wire bite is the single most preventable damage on a bonsai.
- Skipping raffia on thick branches. When bending older, woodier branches more than thirty degrees, wrap the branch in damp raffia or self-amalgamating tape first. The compression layer prevents the outer fibers from splitting.
- Wiring without a plan. Random wraps produce random trees. Spend five minutes deciding what each branch should do before you cut any wire.
Pairing your wiring practice with thoughtful trimming makes both techniques more effective. Our guide to pruning a bonsai tree covers how to clean up the silhouette before you wire so you are shaping only the branches you actually want to keep.
FAQ
How long should I leave wire on a bonsai tree?
It depends on the species and the time of year. Fast-growing deciduous trees like Japanese maples may set in three to six weeks. Tropical trees like ficus usually need two to four months. Slow-growing conifers such as pine and juniper often require six to twelve months. Check weekly and remove the wire at the first sign of bite, regardless of how much time has passed.
Can I wire a bonsai tree in winter?
For many species, yes. Late autumn and early winter are actually preferred seasons for wiring conifers because sap flow is low and the branches are most flexible without active foliage in the way. Avoid wiring during deep dormancy if temperatures drop well below freezing, since the wood becomes brittle. Tropical trees kept indoors can usually be wired any time of year as long as they are healthy.
Does wiring hurt the bonsai tree?
Wiring itself causes minimal stress when done carefully on a healthy tree. The damage almost always comes from wire bite, leaving wire on too long so it cuts into expanding bark. Done correctly and removed on time, wiring is no more harmful than pruning.
What angle should I wrap bonsai wire at?
Wrap at a consistent 45-degree angle along the entire length of the branch. This angle balances holding power with room for natural thickening. Steeper angles slip off the branch. Shallower angles, closer to rings, cut into the bark within weeks.
Can I reuse bonsai wire?
You can reuse aluminum wire that was carefully unwound, as long as it does not have kinks or sharp bends. Reused wire holds slightly less reliably than new wire, so we suggest saving it for practice trees or for low-stress positioning of small twigs. Copper wire is harder to reuse because it work-hardens during application.
What is the difference between wiring and clip-and-grow?
Wiring lets you position a branch in any direction, in any season, with relatively fast results. Clip-and-grow is a slower technique where you prune a branch back to a side bud and let the new shoot grow in the desired direction. Many advanced practitioners blend both methods, using wire for the main structural lines and clip-and-grow for fine ramification near the tips.
How thick should bonsai wire be?
Use the Rule of One-Third: choose a wire whose diameter is roughly one-third the thickness of the branch. For a 6 mm (pencil-thick) branch, that means 2 mm aluminum or 1.5 mm copper. Stock several gauges from 1 mm to 4 mm so you can match the wire to every branch on the tree.
Should I water my bonsai right after wiring?
Wait until the soil is slightly dry, then water normally. Wiring is not a high-stress operation if done gently, so there is no need to withhold water for long. Keep the tree out of harsh direct sun for a week afterward and avoid fertilizing until you see new growth, which signals the tree has accepted the shaping work.